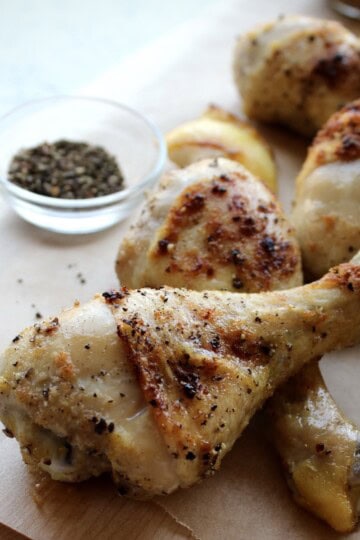
These pickle brine chicken thighs are soaked in real dill pickle juice, then tossed and fried in the lightest, crispiest coating. Punchy pickle flavor, meet juicy fried chicken!

Pickle brined chicken has been on my TBC (to be cooked) list for literal years. My first run-in with the concept was at a local catering company, and I swear my pickle loving heart grew three sizes that day 💚
The fact that our fridge currently stands at 8-count 'em, EIGHT-different types of pickles and/or leftover pickling liquids, in conjunction with the major moment that pickles are having in the food trends department, I find myself unable to continue ignoring the path laid out before me.
(in Rafiki voice)
It is time.
🎵 NAAAAAaaaaants ingonyama.... (No comment on if I may or may not have hoisted a golden piece of pickle juice chicken up for the inhabitants of the savanna to worship 😏)
But I will say that these pickle brined chicken thighs -- are. THAT. good.
Brining chicken in pickle juice not only tenderizes the meat, but it also adds a ton of savory, tangy flavor. I serve mine with a little garlicky dill sauce for dipping and drizzling, because, why the heck not? But I recommend you do try a piece straight up first so as to fully appreciate all of the dilly, pickly goodness.
ingredients for crispy pickle brine chicken thighs

ingredients for garlicky dill sauce

ingredient notes & swaps
- I used dill pickle juice for brining my chicken, but I think half sour or garlic pickle juice will work well too! Brining chicken thighs in bread and butter or sweet pickle brines may get tricky due to the higher sugar content, so I'd avoid those.
- Neutral oil can be canola, sunflower, vegetable, peanut, etc. We're going to be frying at high heat so this is not the place for extra virgin oils. I used about ¼ cup of oil, but the amount you need will depend on the size of the skillet you use.
- You may notice I add black pepper and paprika but no salt! While I wouldn't normally dream of not seasoning chicken with salt before cooking it, the long soak in pickle juice imparts plenty of it into the meat.
- If you don't have whole grain mustard, another type like dijon or spicy brown will work too. Adjust accordingly to suit your tastes!

crispy pickle brine chicken thighs recipe
Dill pickle chicken starts with chicken thighs marinated in real dill pickle juice, then tossed and fried in the lightest, crispiest coating. Punchy pickle flavor + juicy fried chicken = my new love language.
- Total Time: 12 hours 55 minutes
- Yield: 4 servings 1x
Ingredients
for the chicken:
- 2 pounds bone-in, skin-on chicken thighs
- 1 ½ cups pickle juice
- ½ cup all-purpose flour
- 1 tablespoon paprika
- Freshly ground black pepper, to taste
- Neutral oil, as needed for frying
- Fresh dill, as needed for garnish
for the garlicky dill sauce:
- ¼ cup mayonnaise
- 1 tablespoon whole grain mustard
- 1 teaspoon ground coriander
- 2 tablespoons chopped fresh dill
- 1 garlic clove
Instructions
- Place chicken thighs in a large food storage container and pour the pickle juice over them. Make sure all of the chicken is completely submerged, cover and refrigerate for 12-24 hours. Once they're done, remove your pickle marinated chicken thighs from their bath and discard the leftover pickle juice. Pat the thighs dry with paper towels, and arrange them on a plate or platter. Preheat the oven to 375℉

- Whisk the AP flour, paprika, and black pepper together in a bowl.
- Sprinkle the seasoned flour over all sides of the pickle brined chicken thighs. Use tongs to lift and shake the excess flour off of each chicken thigh.
- Place a large skillet over medium high heat and add oil to coat the bottom with about a ¼ inch layer. Once the oil starts to ripple, place the chicken thighs skin side down and cook for 4-5 minutes.
- Flip the thighs over and allow the other side to crisp briefly for 1-2 minutes. Remove from heat.
- Transfer the chicken pieces to a wire rack set into a baking sheet and transfer to the preheated oven. Bake for about 40 minutes, until a meat thermometer inserted into the thickest part of each thigh reads an internal temperature of 165℉.
- While your chicken bakes, make the garlicky dill sauce. In a small bowl, combine the mayo, mustard, coriander, and dill. Grate the garlic clove on a microplane or small grater and stir it in. Set your sauce aside until ready to use.
- Remove from the oven and let rest for about 5 minutes before slicing or serving.
- EAT! Garnish your pickle brined fried chicken thighs with chopped dill and serve with garlicky dill sauce.


Notes
- How long to brine chicken thighs in pickle juice all depends on their size. I have tried mine for 12 and 18 hours, both with delicious results! I would say marinating chicken in pickle juice for 24 hours is the max though, as it could make the chicken overly salty if it goes too long.
- If you use an oven safe skillet, you can definitely pop it straight into the oven if you prefer. Personally I like to transfer the chicken to a baking sheet to keep all of the oil in the skillet from burning and/or splattering all over the inside of the oven.
- If you don't have a microplane or small grater, just finely mince the garlic with a knife.
- Prep Time: 10 minutes
- Brining Time: 12 hours
- Cook Time: 45 minutes
- Category: Dinner, Main Courses
- Method: stovetop
- Cuisine: American
Nutrition
- Serving Size: 1 thigh
- Calories: 484
- Sugar: 0.3 g
- Sodium: 982.5 mg
- Fat: 20.2 g
- Carbohydrates: 17.6 g
- Fiber: 1.4 g
- Protein: 53.5 g
- Cholesterol: 171.2 mg
FAQs
will other cuts of chicken work?
Yeah, definitely! I recommend sticking with bone-in, skin-on cuts as they will give you the juiciest results. You can brine chicken legs, chicken breasts, or quarters (legs and thighs attached). Adjust cooking time to compensate for larger or smaller pieces of meat, making sure each cut reaches 165℉ on the meat thermometer.

dig in!
Enjoy & let me know what you think 🌙 💛